



Instruments and controls
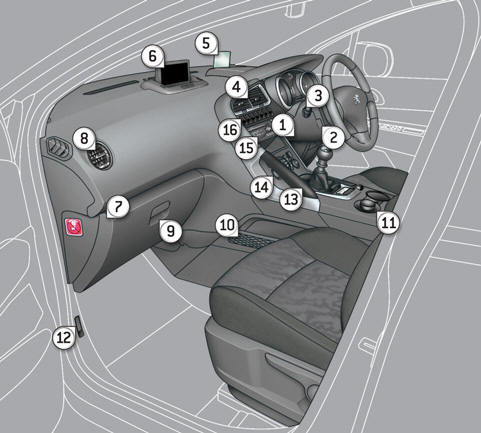
1. Steering wheel adjustment control.
2. Cruise control / speed limiter switches.
3. Lighting and direction indicators control stalk.
4. Central adjustable air vents.
5. Head-up display.
6. Multifunction screen.
7. Passenger's airbag deactivation.
8. Side adjustable air vent.
9. Glove box - Audio/video sockets.
10. Storage compartment with net.
11. Grip control switch.
12. Bonnet release.
13. Grab handle.
14. Heating / air conditioning controls.
15. Audio and telematic system.
16. Switches:
- head-up display,
- hazard warning lamps,
- Distance alert,
- central locking.
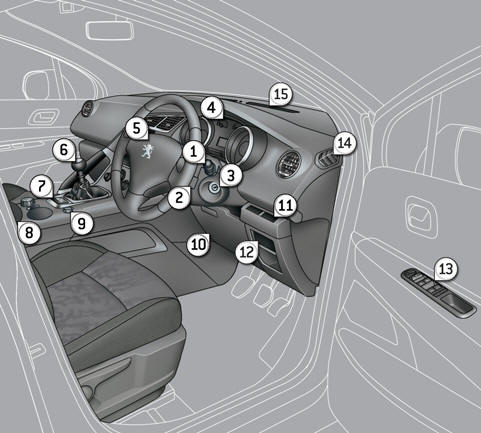
1. Wiper / screenwash / trip computer control stalk.
2. Audio and telematic system steering mounted control.
3. Steering lock and ignition.
4. Instrument panel.
5. Driver's airbag.
Horn.
6. Gear lever.
7. Electric parking brake.
8. Front armrest - Peugeot Connect USB and/or JACK auxiliary socket.
9. 12 V accessory socket.
10. Driver's storage compartment (Handbook).
11. Alarm switch.
Parking sensors switch.
Dynamic stability control switch (ESC/ASR).
Stop & Start deactivation switch.
12. Manual headlamp adjustment.
Instrument panel navigator associated with the Peugeot Connect Media Navigation (RT6).
13. Door mirror controls.
Electric window controls.
Child lock.
14. Front side window demisting vent.
15. Windscreen demisting vent.
See also:
Alarm
System which protects and provides a deterrent against the theft of your vehicle.
It provides two types of protection, exterior and interior, as well as an antitamper
function.
Exterior perimiter ...
Gear shift indicator
Operation
The system intervenes only when driving economically.
Depending on the driving situation and your vehicle's equipment, the system may
advise you to skip one or more gears. You can fo ...
Automatic gearbox
Four-speed automatic gearbox which offers a choice between the comfort of fully
automatic operation, enhanced by sport and snow programmes, or manual gear changing.
There are therefore four driving ...