


Rear seats (308 saloon, 308 SW with bench rear seat)


Bench seat, the left-hand (2/3) or right-hand (1/3) section of which can be folded to adapt the boot load space.
Rear head restraints
These have a high position (comfort and safety) and a low position (rear visibility).
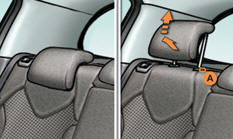
They can also be removed.
To remove a head restraint:
pull the head restraint fully forwards and upwards at the same time,
then, press the lug A
 Never drive with the head restraints
removed; they must be in place and in the high position when passengers are seated
in the rear.
Never drive with the head restraints
removed; they must be in place and in the high position when passengers are seated
in the rear.
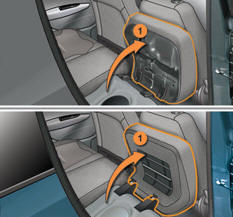
Removing the seat cushion
Move the corresponding front seat forwards if necessary.
Raise the seat cushion 1 lifting it with a hand from the rear.
Tilt the seat cushion 1 fully against the front seat.
Remove the seat cushion 1 from its fixings by pulling upwards.
Refitting the seat cushion
Position the seat cushion 1 vertically in its fixings.
Fold down the seat cushion 1 .
Press on the seat cushion to secure it.
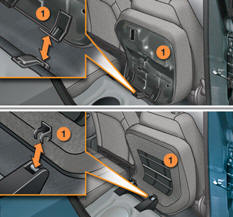
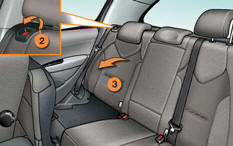
Folding the seat
In order to fold a rear seat without any risk of damage, always start with the seat cushion, never with the seat back: move the corresponding front seat forwards if necessary,
raise the seat cushion 1 lifting it with a hand from the rear,
tilt the seat cushion 1 fully against the front seat,
check that the seat belt is positioned correctly on the side of the seat back,
lower or remove the head restraints if necessary,
pull the control 2 forwards to release the seat back 3,
tilt the seat back 3
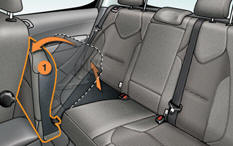
Returning the seat back to its original position
When returning the rear seat back to its original position:
put the seat back 3 in the upright position and secure it,
fold the seat cushion 1,
refit the head restraints or put them back in place.
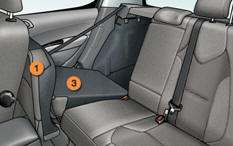
 The seat cushion 1 can be removed
to increase the loading volume.
The seat cushion 1 can be removed
to increase the loading volume.
When returning the rear seat back
to its original position, take care not to trap the seat belts and ensure that their
buckles are positioned correctly.
See also:
Reinitialisation
Following disconnection of the battery, the gearbox must be reinitialised.
Switch on the ignition.
AUTO , and - appear in the instrument
panel.
Select position N.
Press the brake ped ...
Switching the system off
Press the "empty fan"
air flow button until the fan symbol disappears and "---" appears.
This action switches off all of the functions of the air conditioning system.
The tempe ...
16/9 retractable colour screen (with peugeot connect navigation (Rt6) or Peugeot
connect media navigation (Ng4 3d)
Displays in the screen
When the screen is unfolded, it displays the following information automatically
and directly:
- time,
- date,
- altitude,
- ambient temperature (the value displayed fl ...