


Boot fittings
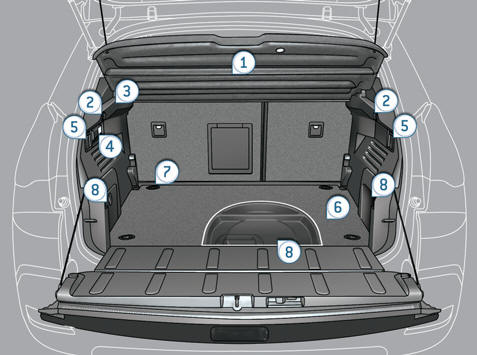
1. Load space cover
2. Hooks
3. 12 V accessory socket (120 W)
4. Torch
5. Rear seats folding controls
6. Adjustable boot (3 position floor )
7. Stowing rings on the floor
8. Storage trays
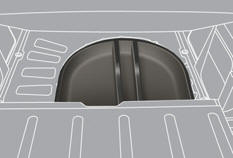
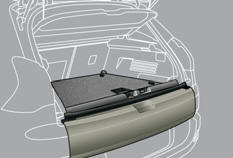
Rear parcel shelf
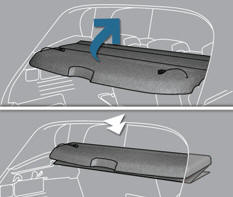
This consists of three sections which can be folded back on each other.
To fold it:
unhook the two cords,
fold it concertina-style to the rear seats.

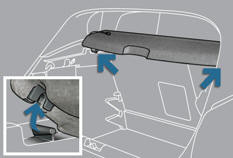
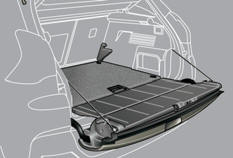
To remove it:
fold the rear parcel shelf as described above,
unclip the fixings on the left and on the right by pushing gently,
place your hands as shown on the illustration then pull the assembly towards you.
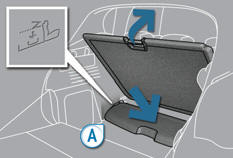
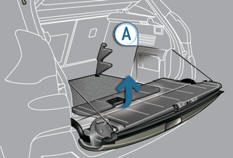
To store it at the bottom of the boot: remove the rear parcel shelf as described above, place the floor at an angle, place the rear parcel shelf in its location (recess marked A ), at bottom of the boot, the rear parcel shelf will be protected if you place the floor in the intermediate position.
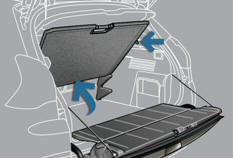
To put it back in place: take hold of the rear parcel shelf with both hands then place it on its support, unfold it to the boot pillars, hook the two cords, if necessary, press on the top of the rear parcel shelf, on the left and on the right, to engage the fixings.
Hooks
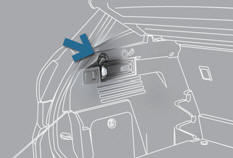
The hooks can be used to secure shopping bags.
![]() When changing a wheel
When changing a wheel
The hooks facilitate access to the spare wheel, retaining the boot carpet by means
of the two cords.
12 V accessory socket
To connect a 12 V accessory (max power: 120 W), remove the cap and connect an appropriate adaptor.
Turn the key to the ignition on position.
Luggage retaining net
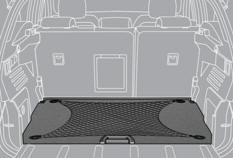
Hooked onto the stowing rings on the movable boot floor, the luggage retaining net available as an accessory enables you to secure your luggage.
Observe the loads indicated on the side of the boot, in accordance with the position of the movable floor.
For safety reasons in case of sharp braking, we recommend that heavy objects are placed on the floor as close as possible to the back of the rear seats.
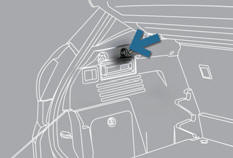
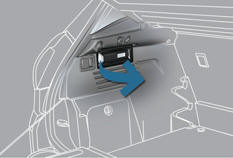
Storage box
Raise the boot carpet, hooking the two cords on the hooks, then gain access to the storage box.
Depending on the configuration, this has areas for storing:
- a box of spare bulbs,
- a first aid kit,
- a tyre repair kit,
- two warning triangles,
Adjustable boot floor
This three position floor allows you to optimise the volume of the boot by means of the guides placed on the sides:
- High position (50 kg max): the floor is level with the closed lower tailgate.
You can load objects while keeping an area protected and isolated.
- Intermediate position (100 kg max): the floor is level with the open lower tailgate.
You obtain a fl at floor to the front seats when the rear seats are in the retracted position.
- Low position (150 kg max): maximum boot volume.
To change the height of the floor: Push the floor fully forwards then, with the help of the support stops A , move the floor to the position required.
To place and support the floor at an angle: From the high position, raise the floor towards the load space cover.
Do not hesitate to pass the two retractable stops then place the floor back on these two stops.
The floor is equipped with four stowing rings to secure your luggage, observing the loads indicated (in the boot).
Torch
This is a removable lamp, fitted in the boot wall, which can be used to illuminate the boot or as a torch.
Operation
This torch operates with NiMH type rechargeable batteries.
It has a battery life of approximately 45 minutes and charges while you are driving.
![]() Observe the polarities when fitting the batteries.
Observe the polarities when fitting the batteries.
Never replace the rechargeable batteries with normal single-use batteries.
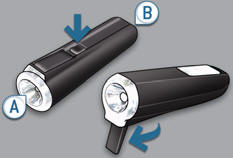
Use
Extract the torch from its location pulling the side of the torch A .
Press the switch, located on the back, to switch the torch on or off.
Unfold the support, located on the back, to set down and raise the torch; for example, when changing a wheel.
Storing
Put the torch back in place in its location starting with the narrow part B .
If you have forgotten to switch off the torch, this switches it off automatically.
![]() It the torch is not engaged correctly, it may not charge and may not come
on when the boot is opened.
It the torch is not engaged correctly, it may not charge and may not come
on when the boot is opened.
Rear side blinds
Fitted on the rear windows, these protect your young children from the sun.
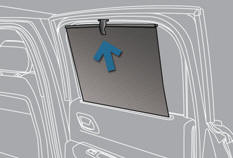
Pull the blind by the central tab.
Position the blind attachment on the hook.
See also:
Peugeot 3008 Review
Peugeot has come quite late to the compact crossover market – the niche
founded by Nissan at the end of 2006 with the big-selling Qashqai. And with the
3008, there are several boundaries being cro ...
Rear screen demist - defrost
The control button is located on
the air conditioning system control panel. ...
Monochrome screen a (with audio equipment)
Displays in the screen
This displays the following information:
- time,
- date,
- ambient temperature * (this fl ashes if there is a risk of ice),
- status of the openings (doors, boot, ...),
...