


Lighting controls
System for selection and control of the various front and rear lamps providing the vehicle's lighting.
Main lighting
The various front and rear lamps of the vehicle are designed to adapt the lighting progressively in relation to the climatic conditions and so improve the driver's visibility:
- sidelamps, to be seen,
- dipped beam headlamps to see without dazzling other drivers,
- main beam headlamps to see clearly when the road is clear,
- directional headlamps for improved visibility when cornering.
Additional lighting
Other lamps are installed to fulfi l the requirements of particular driving conditions:
- a rear foglamp to be seen from a distance,
- front foglamps for even better visibility,
- daytime running lamps to be seen during the day.
Programming
Various automatic lighting control modes are also available according to the following options:
- guide-me-home lighting,
- automatic lighting,
- directional headlamps.
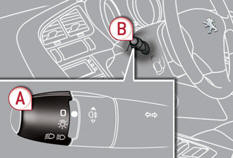
Model without AUTO lighting
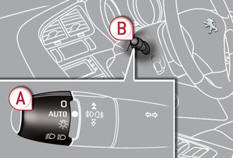
Model with AUTO lighting
Manual controls
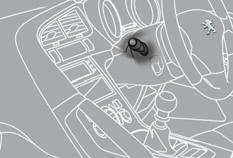
The lighting is controlled directly by the driver by means of the ring A and the stalk B .
A. Main lighting mode selection ring: turn it to position the symbol required facing the mark.
 Lighting off / daytime running lamps.
 Automatic illumination of headlamps.
 Sidelamps.
 Dipped headlamps or main beam headlamps.
B. Stalk for switching headlamps: pull the stalk towards you to switch the lighting between dipped and main beam headlamps.
In the lamps off and sidelamps modes, the driver can switch on the main beam headlamps temporarily ("headlamp fl ash") by maintaining a pull on the stalk.
Displays
Illumination of the corresponding indicator lamp in the instrument panel confirms that the lighting selected is on.
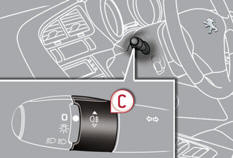
Model with rear foglamp only
Model with front and rear foglamps
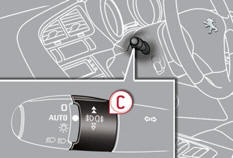
C. Fog lamps selection ring.
 Rear foglamp
This operates with dipped and main beam headlamps.
To switch on the foglamp, turn the ring C forwards.
To switch off the foglamp, turn the ring C rearwards.
When the lighting is switched on automatically (with AUTO model), the dipped beam headlamps and sidelamps remain on until the rear foglamp is switched off.
 Front and rear foglamps
The rear foglamp operates with the dipped and main beam headlamps.
The front foglamps also operate with the sidelamps.
To switch on the rear foglamp, turn the ring C forwards.
To switch on the front foglamps, turn the ring C forwards again.
To switch off the rear foglamp, turn the ring C rearwards.
To switch off the front foglamps, turn the ring C rearwards again.
When the lighting is switched on automatically (with AUTO model), the dipped beam headlamps and sidelamps remain on until the rear foglamp is switched off.
When the lighting is switched off automatically (with AUTO model) or when the dipped beam headlamps are switched off manually, the foglamps and the sidelamps will remain on.
![]() In good or rainy weather, by both day and night, the front foglamps and
the rear foglamp are prohibited. In these situations, the power of their beams may
dazzle other drivers.
In good or rainy weather, by both day and night, the front foglamps and
the rear foglamp are prohibited. In these situations, the power of their beams may
dazzle other drivers.
Do not forget to switch off the front foglamps and the rear foglamp when they are no longer necessary.
Lighting on audible warning
When the ignition is switched off, all of the lamps switch off automatically, unless guide-me-home lighting is activated.
If the lighting is switched on manually after switching off the ignition, there is an audible signal when a front door is opened to warn the driver that they have forgotten to switch off the vehicle's lighting, with the ignition off.
![]() In some weather conditions (e.g. low temperature or humidity), the presence
of misting on the internal surface of the glass of the headlamps and rear lamps
is normal; it disappears after the lamps have been on for a few minutes.
In some weather conditions (e.g. low temperature or humidity), the presence
of misting on the internal surface of the glass of the headlamps and rear lamps
is normal; it disappears after the lamps have been on for a few minutes.
Led lamps
They come on when the engine is started.
Depending on the destination country, they are used for:
- daytime running lamps in day mode and sidelamps in night mode (they are brighter when daytime running lamps),
or
- sidelamps in day and night mode.
Programming

In countries in which this function is not imposed by regulations, with the vehicle stationary, use the navigator to activate or deactivate the function in the multifunction screen configuration menu.
The sidelamps and number plate lamps come on as well.
Programming The lighting duration is selected via the vehicle configuration menu.
The duration of the welcome lighting is associated with and identical to that of the automatic For countries where the function is a guide-me-home lighting.
legal requirement, it is activated by default.
Manual guide-me-home lighting
The temporary illumination of the dipped beam headlamps after the vehicle's ignition has been switched off makes the driver's exit easier when the light is poor.
Switching on
With the ignition off, "fl ash" the headlamps using the lighting stalk.
A further "headlamp fl ash" switches the function off.
Switching off
The manual guide-me-home lighting switches off automatically after a set time.
See also:
A range of high-performance power trains
The weight, the aerodynamics, the very low and ultra low rolling resistance
tyres and, of course, the expertise and technological innovation of the Group in
the engine domain are factors which all ...
ISOFIX child seats recommended by PEUGEOT and approved for your vehicle
Follow the instructions for fitting child seats contained in the seat manufacturer's
installation guide. ...
Changing a wheel
Procedure for changing a faulty wheel for the spare wheel using the tools provided
with the vehicle. ...