


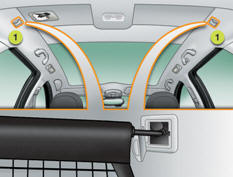
Boot fittings (308 SW with individual rear seats)

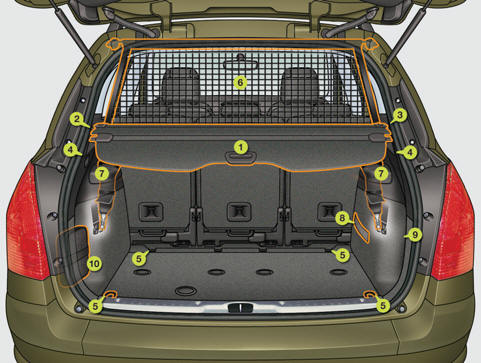
1. Load space screen (see details on following page)
2. Storage box
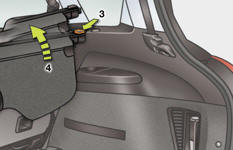
3. 12 V accessory socket (see details on following page)
4. Hooks (see details on following page)
5. Stowing rings
6. High load retaining net (see details on following page)
7. Rear armrests with cup holder
8. Luggage retaining strap
9. Location for torch or for Hi-Fi amplifier (see details on following page)
10. Temporary puncture repair kit
Load space screen
To remove the load space screen:
remove the load space screen guides from the rails on the boot pillars,
roll up the load space screen in its roller,
pull and support the catch at one of the ends of the roller to release it,
remove the roller from its support from the released end, then from the second.
To install the load space screen:
position one of the ends of the roller in its support,
insert the second end in its support;
the catch locks automatically,
unroll the load space screen to the boot pillars,
insert the load space screen guides in the rails on the boot pillars.
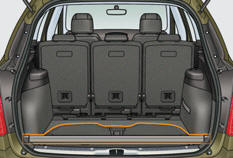
To store the load space screen, place it at the boot sill, roller uppermost and flap facing inwards.
High load retaining net
Hooked onto the special upper and lower fixings, this permits use of the entire loading volume up to the roof behind the seats of the 2nd row.
 When positioning the net, check
that the strap loops are visible from the boot; this will make slackening or tightening
easier.
When positioning the net, check
that the strap loops are visible from the boot; this will make slackening or tightening
easier.
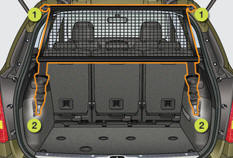
To use the net in the 2nd row (additional seats folded or removed):
roll up or remove the load space screen,
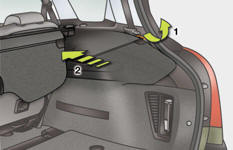
open the covers of the upper fixings 1 ,
unroll the high load retaining net,
position one of the ends of the net's metal bar in the corresponding upper
fixing 1 , then do the same with the other end,
attach the snap hook of each of the net's straps in the corresponding ring 2
, located on the lower fixing of the rear side seat belt,
tighten the straps,
check that the net is hooked and tightened correctly.
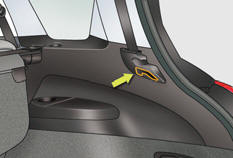
12 V accessory socket

To connect a 12 V accessory (max power: 120 W), remove the cap and connect an appropriate adaptor.
Turn the key to the ignition on position.
Hooks
The hooks can be used to hold shopping bags.
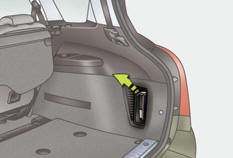
Torch
This is a removable lamp, fitted in the boot wall, which can be used to light the boot or as a torch.
For the boot lamp function, refer to the "Visibility - § Boot lamp" section.
Operation
This torch operates with NiMH type rechargeable batteries.
It has a battery life of approximately 45 minutes and charges while you are driving.
 Observe the polarities when fitting the rechargeable batteries.
Never replace the rechargeable batteries with normal disposable batteries.
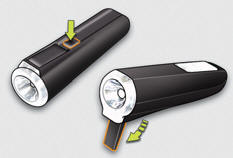
Use
Extract the torch from its location pulling it upwards.
Press the switch, located on the back, to switch the torch on or off.
Unfold the support, located on the back, to set down and raise the torch; for example, when changing a wheel.
Storing
Put the torch back in place in its location starting with the lower part.
If you have forgotten to switch off the torch, this switches it off automatically.
It the torch is not engaged correctly,
it may not charge and may not come on when the boot is opened.
Side blinds
Fitted on the rear windows of the 2nd row, these protect your young children from the sun.
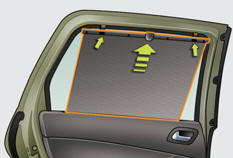
Pull the blind by the central tab.
Position the blind attachments on the corresponding hooks.
See also:
Changing a wiper blade
Before removing a front wiper blade
Within one minute after switching off the ignition, operate the wiper stalk to
position the wiper blades vertically on the windscreen.
Removing
Raise the ...
Definitions
Anti-lock braking system (ABS) and electronic brake force distribution (EBFD)
This system improves the stability and manoeuvrability of your vehicle when braking
and provides improved control in co ...
Compactness and lightness
The reduced front overhang (- 6 cm compared with the 207) and the shorter
rear overhang (- 1 cm) , alongwith the reduced weight of the vehicle, directly
benefit improved proportions, agility and e ...