


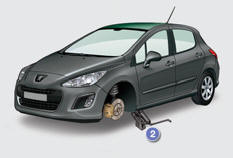
Changing a wheel (308 SW with bench rear seat, 308 SW with individual rear seats)


Procedure for changing a faulty wheel for the spare wheel using the tools provided with the vehicle.
Access to the tools
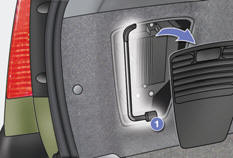
The wheelbrace 1 is stowed in the boot left-hand side trim; for access to it:
open the boot,
open the access flap in the left-hand side trim,
unclip the wheelbrace from its support,
The tools 2 and 3 are stowed in a box fitted under the spare wheel; the assembly is installed underneath the rear of the vehicle (refer to the section "Access to the spare wheel" on the following page for instructions on how to get them out).
List of tools
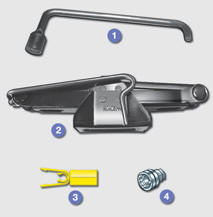
All of these tools are specific to your vehicle. Do not use them for other purposes.
1. Wheelbrace.
For removing the wheel trim wheel fixing bolts.
2. Jack with integral handle.
For raising the vehicle.
3. Wheel bolt finisher tool.
Used for removing the wheel bolt finisher caps on alloy wheels.
4. Socket for the security bolts (located in the glove box or in the tool box under the spare wheel).
For adapting the wheelbrace to the special security bolts.
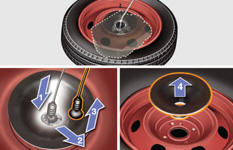
 Wheel with trim
When removing the wheel , detach the trim first using the wheelbrace 1 pulling
at the valve passage hole.
When refitting the wheel , refit the trim starting by placing its notch facing the valve and press around its edge with the palm of your hand.
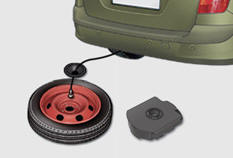
Access to the spare wheel
The spare wheel is supported by a winch system underneath the rear of the vehicle.
According to country, the spare wheel may be steel, alloy or of the "spacesaver"
type.
Fitting a steel or "space-saver"
type spare wheel
If your vehicle is fitted with alloy wheels, it is normal to notice, when tightening the bolts on fitting, that the washers do not come into contact with the steel or "space-saver"
type spare wheel. The wheel is secured by the conical contact of each bolt.
Taking out the wheel
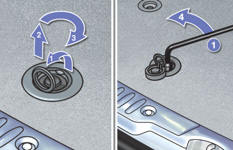
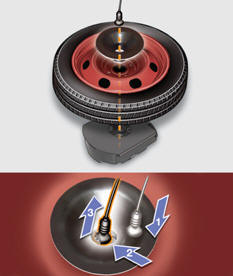
Lift up the cover eyelet, pull the cover upwards, then pivot it to open the flap; these actions release the winch and give access to its control nut.
Unscrew this nut fully, using the wheelbrace 1 , to unwind the winch cable.
Once the wheel/box is on the ground, disengage the assembly from the rear of the vehicle.
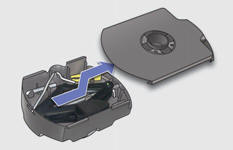
Detach the hook mechanism to release the wheel/box assembly, as shown in the illustration.Take out the black plastic centring cone.
Access to the set of tools
Lift up the wheel to release the set of tools.
To open the storage box, slide the cover until half open, then pull it off.
If you purchase a wheel of standard
size to replace the "space-saver"
type spare wheel, the spacer, located underneath the vehicle, must be removed. Contact a PEUGEOT dealer or a qualified workshop.
Tyre under-inflation detection
The spare wheel is not fitted with a sensor. The punctured wheel must be repaired by a PEUGEOT dealer or a qualified workshop.
Putting the wheel back in place
Store tools 2 and 3 in the box and close the cover.
Position the box on the ground.
Place the spare wheel on the box.
Fit the black plastic centring cone in the centre of the wheel (on steel or "space-saver" type wheels only).
Pass the hooking device through the cone and the wheel to secure it to the box cover.
Raise the wheel/box assembly underneath the rear of the vehicle by tightening the winch control nut using the wheelbrace 1 .
Fully tighten the nut.
Close the flap with the eyelet and cover to secure the winch.
Check that the wheel is located squarely against the floor.
If not, repeat the operation.

Removing the wheel
Parking the vehicle
Immobilise the vehicle where it does not block traffic: the ground must be
level, stable and non-slippery ground.
Apply the parking brake, switch off the ignition and engage first gear * to lock
the wheels.
If necessary, place a chock under the wheel diagonally opposite the wheel to
be changed.
It is imperative that you ensure that the occupants get out of the vehicle and wait where they are safe.
Never go underneath a vehicle raised using a jack; use an axle stand.
* position R for the electronic gear control gearbox; P for the automatic gearbox.
List of operations
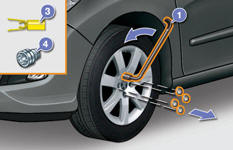
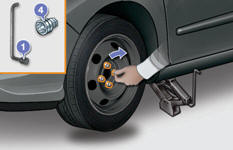
Remove the finisher cap from each wheel bolt using tool 3 .
Fit the security socket 4 on the wheelbrace 1 to slacken the security bolt.
Slacken the other bolts using the wheelbrace 1 only.
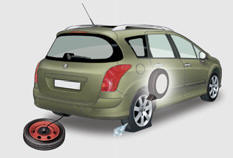
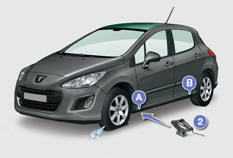
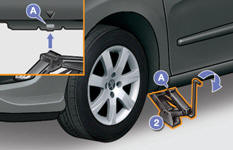
Place the jack 2 in contact with one of the two front A or rear B locations provided on the underbody, whichever is closest to the wheel to be changed.
Extend the jack 2 until its base plate is in contact with the ground. Ensure that the centreline of the jack base plate is directly below the location A or B used.
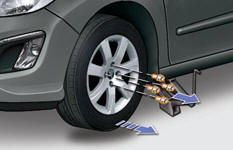
Raise the vehicle until there is sufficient space between the wheel and the ground to admit the spare (not punctured) wheel easily.
Remove the bolts and store them in a clean place.
Remove the wheel.
Fitting the wheel
After changing a wheel
To store the punctured wheel in the boot correctly, first remove the central cover.
When using the "space-saver" type spare wheel, do not exceed 50 mph (80 km/h).
Have the tightening of the bolts and the pressure of the spare wheel checked by a PEUGEOT dealer or a qualified workshop without delay.
Have the punctured wheel repaired and replace it on the vehicle as soon as possible.
List of operations
Put the wheel in place on the hub.
Screw in the bolts by hand to the stop.
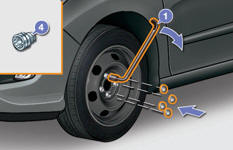
Pre-tighten the security bolt using the wheelbrace 1 fitted with the security socket 4 .
Pre-tighten the other bolts using the wheelbrace 1 only.
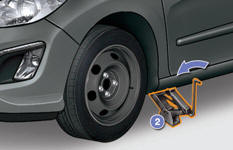
Lower the vehicle fully.
Fold the jack 2 and detach it.
Tighten the security bolt using the wheelbrace 1 fitted with the security socket 4 .
Tighten the other bolts using the wheelbrace 1 only.
Refit the finisher caps on each wheel bolt.
Store the tools in the box.
See also:
Stop & start
The Stop & Start system puts the engine temporarily on standby - STOP mode -
during stops in the traffic (red lights, traffic jams, or other...). The engine
restarts automatically - START mode ...
A low consumption and ultra-efficient version
Pulling together the very essence of the A9 project by reviewing every aspect
of design, the low consumption version achieves an aerodynamic performance (Cx
de 0,29 ) thanks to the optimisation of ...
Lateral airbags
System which protects the driver and front passenger in the event of a serious
side impact in order to limit the risk of injury to the chest, between the hip and
the shoulder. Each lateral airba ...